The following article describes how to implement an unified logging system for your Docker containers. Any production application requires to register certain events or problems during runtime. The old fashion way is to write these messages to a log file, but that inherits certain problems specifically when we try to perform some analysis over the registers, or in the other side, if the application have multiple instances running, the scenario becomes even more complex.

On Docker v1.6, the concept of logging drivers was introduced, basically the Docker engine is aware about output interfaces that manage the application messages. For Docker v1.8, we have implemented a native Fluentd logging driver, now you are able to have an unified and structured logging system with the simplicity and high performance Fluentd.
Using the Docker logging mechanism with Fluentd is a straightforward step, to get started make sure you have the following prerequisites:
The first step is to prepare Fluentd to listen for the messages that will receive from the Docker containers, for demonstration purposes we will instruct Fluentd to write the messages to the standard output; In a later step you will find how to accomplish the same aggregating the logs into a MongoDB instance.
Create a simple file called in_docker.conf which contains the following entries:
<source>
  @type forward
  port 24224
  bind 0.0.0.0
</source>

<match *.*>
  @type stdout
</match>
With this simple command start an instance of Fluentd:
$ fluentd -c in_docker.conf
If the service started you should see an output like this:
$ fluentd -c in_docker.conf
2015-09-01 15:07:12 -0600 [info]: reading config file path="in_docker.conf"
2015-09-01 15:07:12 -0600 [info]: starting fluentd-0.12.15
2015-09-01 15:07:12 -0600 [info]: gem 'fluent-plugin-mongo' version '0.7.10'
2015-09-01 15:07:12 -0600 [info]: gem 'fluentd' version '0.12.15'
2015-09-01 15:07:12 -0600 [info]: adding match pattern="*.*" type="stdout"
2015-09-01 15:07:12 -0600 [info]: adding source type="forward"
2015-09-01 15:07:12 -0600 [info]: using configuration file: <ROOT>
  <source>
    @type forward
    port 24224
    bind 0.0.0.0
  </source>
  <match docker.*>
    @type stdout
  </match>
</ROOT>
2015-09-01 15:07:12 -0600 [info]: listening fluent socket on 0.0.0.0:24224
By default, the Fluentd logging driver will try to find a local Fluentd instance (step #2) listening for connections on the TCP port 24224, note that the container will not start if it cannot connect to the Fluentd instance.
The following command will run a base Ubuntu container and print some messages to the standard output, note that we have launched the container specifying the Fluentd logging driver:
$ docker run --rm --log-driver=fluentd --log-opt tag="docker.{{.ID}}" ubuntu echo 'Hello Fluentd!'
Hello Fluentd!
Now on the Fluentd output, you will see the incoming message from the container, e.g:
2015-09-01 15:10:40 -0600 docker.3fd8678d487e: {"source":"stdout","log":"Hello Fluentd!","container_id":"3fd8678d487e540c7a303e1613101e746c5012f3317434eda93f24351c1928f7","container_name":"/angry_kalam"}
At this point you will notice something interesting, the incoming messages have a timestamp, are tagged with the container_id and contains general information from the source container along the message, everything in JSON format.
Application log is stored into "log" field in the record. You can parse this log by using filter_parser filter before send to destinations.
<filter docker.**>
  @type parser
  format json # apache2, nginx, etc...
  key_name log
  reserve_data true
</filter>
Original event:
2015-09-01 15:10:40 -0600 docker.3fd8678d487e: {"source":"stdout","log":"{\"key\":\"value\"}","container_id":"3fd8678d487e540c7a303e1613101e746c5012f3317434eda93f24351c1928f7","container_name":"/angry_kalam"}
Filtered event:
2015-09-01 15:10:40 -0600 docker.3fd8678d487e: {"source":"stdout","log":"{\"key\":\"value\"}","container_id":"3fd8678d487e540c7a303e1613101e746c5012f3317434eda93f24351c1928f7","container_name":"/angry_kalam","key":"value"}
Application log is stored into "log" field in the records. You can concatenate these logs by using fluent-plugin-concat filter before send to destinations.
<filter docker.**>
  @type concat
  key log
  stream_identity_key container_id
  multiline_start_regexp /^-e:2:in `\/'/
  multiline_end_regexp /^-e:4:in/
</filter>
Original events:
2016-04-13 14:45:55 +0900 docker.28cf38e21204: {"container_id":"28cf38e212042225f5f80a56fac08f34c8f0b235e738900c4e0abcf39253a702","container_name":"/romantic_dubinsky","source":"stdout","log":"-e:2:in `/'"}
2016-04-13 14:45:55 +0900 docker.28cf38e21204: {"source":"stdout","log":"-e:2:in `do_division_by_zero'","container_id":"28cf38e212042225f5f80a56fac08f34c8f0b235e738900c4e0abcf39253a702","container_name":"/romantic_dubinsky"}
2016-04-13 14:45:55 +0900 docker.28cf38e21204: {"source":"stdout","log":"-e:4:in `<main>'","container_id":"28cf38e212042225f5f80a56fac08f34c8f0b235e738900c4e0abcf39253a702","container_name":"/romantic_dubinsky"}
Filtered events:
2016-04-13 14:45:55 +0900 docker.28cf38e21204: {"container_id":"28cf38e212042225f5f80a56fac08f34c8f0b235e738900c4e0abcf39253a702","container_name":"/romantic_dubinsky","source":"stdout","log":"-e:2:in `/'\n-e:2:in `do_division_by_zero'\n-e:4:in `<main>'"}
The Fluentd logging driver support more options through the --log-opt Docker command line argument:
There are popular options. See full list in the official document.
Specify an optional address for Fluentd, it allows to set the host and TCP port, e.g:
$ docker run --rm --log-driver=fluentd --log-opt fluentd-address=192.168.2.4:24225 ubuntu echo '...'
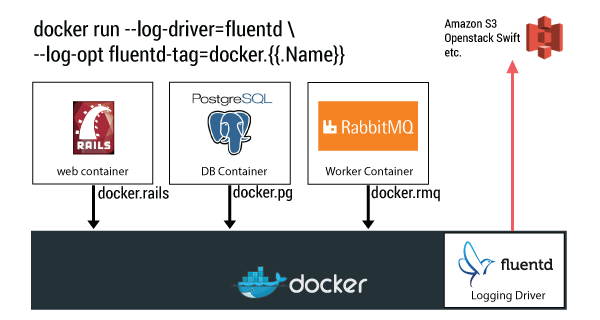
Tags are a major requirement on Fluentd, they allows to identify the incoming data and take routing decisions. By default the Fluentd logging driver uses the container_id as a tag (12 character ID), you can change it value with the fluentd-tag option as follows:
$ docker run --rm --log-driver=fluentd --log-opt tag=docker.my_new_tag ubuntu echo "..."
Additionally this option allows to specify some internal variables: {{.ID}}, {{.FullID}} or {{.Name}}. e.g:
$ docker run --rm --log-driver=fluentd --log-opt tag=docker.{{.ID}} ubuntu echo "..."
Generates event logs in nanosecond resolution for fluentd v1. The default is false.
In a more serious environment, you would want to use something other than the Fluentd standard output to store Docker containers messages, such as Elasticsearch, MongoDB, HDFS, S3, Google Cloud Storage and so on. This can be done by installing the necessary Fluentd plugins and configuring fluent.conf appropriately for <match docker.all>...</match> section.
Interested in other data sources and output destinations? Check out the following resources:
Want to learn the basics of Fluentd? Check out these pages.
Couldn't find enough information? Let's ask the community!
You need commercial-grade support from Fluentd committers and experts?
©2010-2026 Fluentd Project. ALL Rights Reserved.
Fluentd is a hosted project under the Cloud Native Computing Foundation (CNCF). All components are available under the Apache 2 License.
The Linux Foundation has registered trademarks and uses trademarks. For a list of trademarks of The Linux Foundation, please see our Trademark Usage page.