You have an application written in Rails and want to collect data into MongoDB, HDFS, Elasticsearch, et. al. for analytics/search.
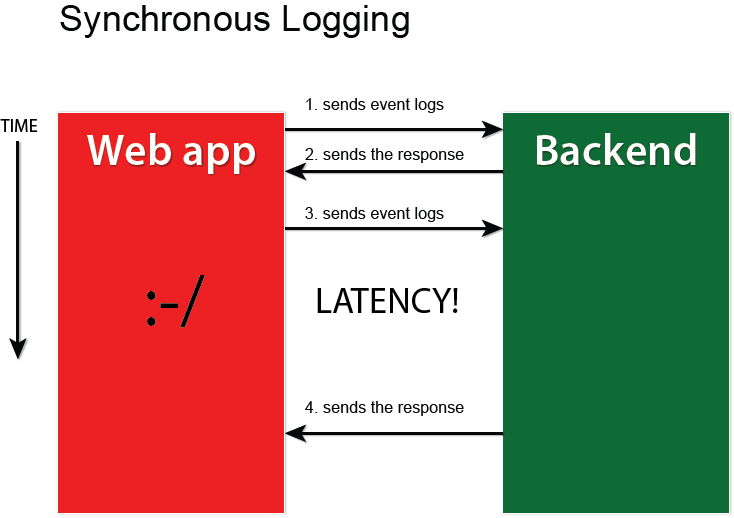
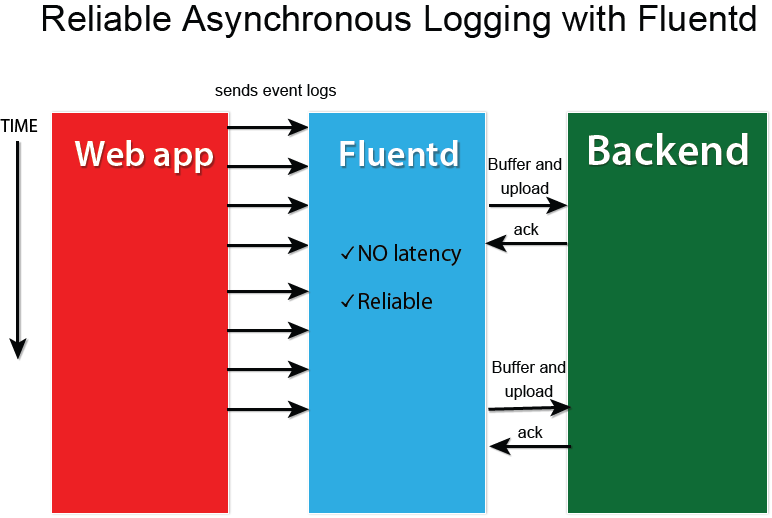
Logging directly into MongoDB/HDFS/Elasticsearch is not highly recommended since synchronous logging is slow/potentially hazardous for the backend. You can build asynchronous logging into your application, but Fluentd can sit between your application and backend systems to achieve reliable, asynchronous logging.
|
|
Rails comes with an excellent logging API, which we will take advantage of to connect Rails logger to Fluentd.
We assume that Rails is 4.0 and above in the rest of this article.
Set up Fluentd with in_forward. By default, Fluentd has this enabled. It is the following section in the configuration file:
<source>
  @type forward
  port 24224
</source>
<match foo>
  @type stdout
</match>
The above configuration makes Fluentd listen to TCP requests on port 24224.
In your Rails app's Gemfile, add the following lines
gem 'act-fluent-logger-rails'
gem 'lograge'
Lograge is a gem that transforms Rails logs into a more structured, machine-readable format. act-fluent-logger-rails is a community-contributed logger for Fluentd.
Then, run bundle install to update your gems.
Next, go into config/application.rb and add the following lines
module SampleApp
  class Application < Rails::Application
    # other lines...
    config.log_level = :info
    config.logger = ActFluentLoggerRails::Logger.new
    config.lograge.enabled = true
    config.lograge.formatter = Lograge::Formatters::Json.new
  end
end
If you want logging to take place only for production, then edit config/environments/production.rb instead of config/application.rb.
Next, add config/fluent-logger.yml into your Rails project. Its content should look like this:
development:
  fluent_host:   '127.0.0.1'
  fluent_port:   24224
  tag:           'foo'
  messages_type: 'string'

test:
  fluent_host:   '127.0.0.1'
  fluent_port:   24224
  tag:           'foo'
  messages_type: 'string'

production:
  fluent_host:   '127.0.0.1'
  fluent_port:   24224
  tag:           'foo'
  messages_type: 'string'
Now, if you start Fluentd and Rails and access your Rails app, you should get a line like this in your Fluentd's stdout:
2014-07-07 19:39:01 +0000 foo: {"messages":"{\"method\":\"GET\",\"path\":\"/\",\"format\":\"*/*\",\"controller\":\"static_pages\",\"action\":\"home\",\"status\":200,\"duration\":550.14,\"view\":462.89,\"db\":1.2}","level":"INFO"}
i.e., the data shows up as serialized JSON in the "messages" field. This is a little hard to work with, so let's use fluent-plugin-parser to parse the JSON field. Run
gem install fluent-plugin-parser
to install it. fluent-plugin-parser lets you parse the value of a particular field and replace the event with the parsed data. So, set up Fluentd's configuration as follows:
<source>
  @type forward
  port 24224
  @label @raw
</source>
<label @raw>
  <filter>
    @type parser
    key_name messages
    <parse>
      @type json
    </parse>
  </filter>
  <match>
    @type relabel
    @label @rails
  </match>
</label>
<label @rails>
  <match>
    @type stdout
  </match>
</label>
Now, if you restart Fluentd and access your Rails app, you should see data like this in Fluentd's stdout.
2014-07-07 19:39:01 +0000 rails: {"method":"GET","path":"/","format":"*/*","controller":"static_pages","action":"home","status":200,"duration":550.14,"view":462.89,"db":1.2}
That's it. Now, you can configure Fluentd's outputs to send events to various backend systems. To do so, simply replace
<match rails>
  @type stdout
</match>
with the output plugin of your choice. For example, if you are sending data to Elasticsearch, first install the Elasticsearch output plugin
gem install fluent-plugin-elasticsearch
and replace the match statement with
<label @rails>
  <match>
    @type elasticsearch
    host <YOUR_HOST>
    port <YOUR_PORT>
    logstash_format true
    # other options...
  </match>
</label>
(Do not forget to install the corresponding output plugin!)
It's time to configure data outputs. Here are some examples.
Want to learn the basics of Fluentd? Check out these pages.
Couldn't find enough information? Let's ask the community!
You need commercial-grade support from Fluentd committers and experts?
©2010-2026 Fluentd Project. ALL Rights Reserved.
Fluentd is a hosted project under the Cloud Native Computing Foundation (CNCF). All components are available under the Apache 2 License.
The Linux Foundation has registered trademarks and uses trademarks. For a list of trademarks of The Linux Foundation, please see our Trademark Usage page.